| Attachment | Size |
|---|---|
| 15.56 KB | |
| 140 KB |
What is AppleSlave? AppleSlave is an Arduino program (written by Dave Schmenk) to be able to read from an SD card directly
from your Apple II and write files to the Apple II disk drive! I wanted to make a quick updated guide on this project since
some things have changed a bit. I only recently discovered this inexpensive, Amazing way to make backups on Apple II easily
and quickly without being tethered to another PC or buying an expensive floppy disk writer and I wanted to share it with others.
OK! Let's get started!
First off here is the original artical, Read It. = http://schmenk.is-a-geek.com/wordpress/?p=239
What you need: Arduino Uno or Nano, USB cable, an SD card adapter for Arduino, SD card formatted to fat or fat32, Arduino IDE, SDFat.po, AppleSlave.ino,
ADTPro for writing the SDFat.po to disk or some other way to do so, ribbon cable, two 16 pin sockets one needs to be machined and the other is the old style,
a soldering iron and solder.
Start off by installing the Arduino ide if you have not already and download the SDfat library version 1.0.1 from downloads in the Arduino IDE.
Here is a link to the appleslave.ino: https://github.com/dschmenk/Arduino/tree/master/AppleSlave
Open the Appleslave.ino
OK! Now lets include the sd fat library. Go to Sketch, include library, sdfat, in the Arduino IDE.
Now upload..... did it work? It should have.
On to the next step!
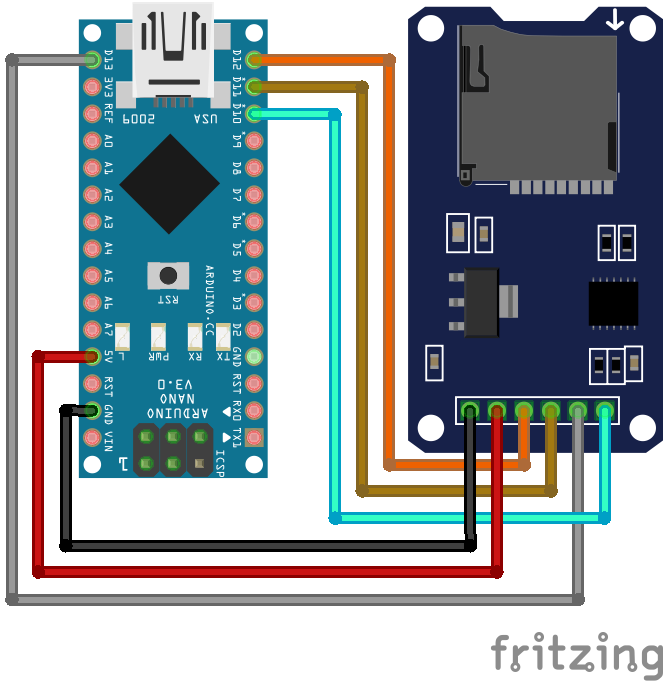
Lets solder the sd card to the arduino Nano, Here is what i used
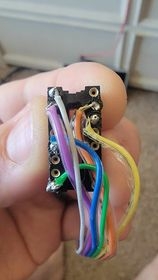
Now solder the wires from the arduino to the 16pin socket like this:
Arduino | gameport (16 pin socket)
5v = Pin 1
D7 = Pin 2
D6 = Pin 5
Gnd = Pin 8
D3 = Pin 14
D8 = Pin 15
White is pin 1 Sorry about the feet haha the arduino side
The hardware should be done at this point, onto the apple side of things.
Find a way to bootstrap adtpro and write the SDfat.po image to a floppy, google should help you out on that one.
Put some apple II disk files on the root of the sdcard, i recommend renaming them with shorter names to make it easier.
With the hardware correctly connected to the apple II load your new SDfat disk
When loaded type: +FATCAT
It should give you a directory of files on the drive, if that works then you should be good to write disks!
To write floppys type: +FATWRITEDSK FILENAME 2 (or 1 if you only have 1 drive just remember to remove the sdfat floppy before making the new one)
.............................. done. you should have a new floppy!!!!!
I hope i made it clear enough for everyone! Thanks!


I remember something about this projct within the last year or two.
Gotta build me one!
There have been several versions of this over the years. I built one using an Arduino Uno and an SD "data shield" card a few years ago. That was using a full size SD card. That version also had a real time clock that you could read from the Apple II through software on the Arduino. It was very slow due to bit banging all the data using the game port but it did work.
These days the Dan ][ card or Dan's other card which you can plug an Arduino Uno and shields onto is a higher speed (due to use of an 82C55 parallel chip to interface to the Atmel processor), albeit obviously more expensive (but not really crazily so) option.