Dr. Webster's Guide to the MacQuarium
Introduction
It all started back in the summer of 2000. I worked at a computer store that sold used machines; I was the Mac tech. One day, a guy pulls around the back of the store in a beat up pickup, the bed full of Mac Pluses. We couldn't offer him any money for them -- way too old to be resold for practical use -- but he gave them to us anyway. I sat there, my repair bench stacked with them, and wondered if there was something else they could be used for other than landfill fodder.
I searched the Internet, and read about folks building MacQuariums, aquariums built out of the cases of old compact Macs. I found one of the popular guides at the time and built one. It sucked. The tank looked sloppy, and there was wasted space inside the case, space that could be put towards making the tank bigger. I decided that I could build a better MacQuarium. So I did, and thus Dr. Webster's Guide to the MacQuarium was born.
Here, for your reading pleasure, is a completely revised and rewritten Guide. The tank dimensions, which I mocked up in my basement one night with cardboard and a Sharpie, are still the same, but everything else has been refined with the knowledge of almost 10 years of folks submitting their own MacQuariums to the Applefritter gallery. They're a bit obscure, they're certainly unusual, but they're always exceptional. Enjoy!
Gutting the Donor
Before we can get down to doing all the fun drilling and cutting and hacking, we need a plain empty classic Mac shell. If you have an old compact Mac laying around, you can gut it and use its shell. This guide assumes you have one of the following Macs:
- Mac 128k
- Mac 512k
- Mac Plus
- Mac SE
- Mac SE/30
- Mac Classic
- Mac Classic II
All-in-one Macs other than these will likely need adjustments to the tank dimensions in order to work -- for that, you're on your own.
If you'd rather not deal with the electronics or don't otherwise have a donor Mac, there are many places where you can get one, including eBay, Mac parts companies, flea markets, and garage sales. Take your pick; no matter where you get the donor, it shouldn't cost you more than $20.
You're going to need some tools in order to crack open and gut your donor Mac. Here's the basic list:
- Mac cracker (see below)
- Torx T-15 screwdriver
- Philips screwdriver
- Monitor discharge tool & electrician's gloves (see below)
Most compact Macs have four screws that hold the casing together. Two are on the back by the I/O ports, and two are underneath the handle on the top. Apple put those two "hidden" screws there on purpose to keep end-users from opening up their computers, as the CRT display inside can be dangerous to work around. Mac service centers were given a special, long-handled T-15 screwdriver to get to these screws, known as a Mac cracker. Some of these are floating around on eBay and the like, and a few companies carry long-handled T-15 drivers.
Finding a suitable Mac cracker is one of the most difficult parts of making a MacQuarium. Official Mac crackers are pretty rare, and I've only heard of a few reports of people actually finding long T-15 drivers in hardware stores. Supposedly, Sears stores carry them, but I have yet to see one in person.
For those who don't want to spend the money on a tool that will probably only be used once, I've developed a homebrew solution.

All you need is an ordinary ballpoint pen, a screwdriver with interchangeable bits, and 1/4" and T-15 bits for it. Just take everything out of the pen so you're left with the casing, jam the bits into the ends, and stick it on your screwdriver. You should have no problem getting to those two difficult screws now.
So once the two under-the-handle screws are out, take out the two by the I/O ports. On the Mac Plus, note that there's also a screw inside the battery compartment. With the screws out, place the Mac face-down on your work surface and lift the rear shell off. It might be on there a little tightly; give it a gentle whack or two to loosen it if necessary. 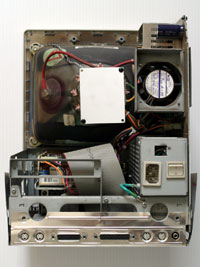
At this point we need to separate the meek from the geek. The CRT inside the Mac holds several thousand volts even if the power to the computer is off. In order to remove the CRT, you need to discharge it first. Discharging a CRT is a tricky (and somewhat dangerous) process, so if you're unfamiliar with the procedure your best bet is to either find a CRT-less Mac shell, or take your Mac to a local TV repair shop where they can (for a nominal fee) discharge and remove the CRT for you.
 For those familiar with discharging the CRT, go ahead and remove it. Be sure to dispose of it properly, as CRTs, especially older ones, contain a high proportion of lead. If you're not sure what to do with the CRT or any other parts you pull out of the Mac, contact your waste disposal company for directions.
Once the tube is gone, all you need to do is get out your trusty screwdriver and remove all internal components. Your goal is to have an empty back shell and a plain front bezel, with no metal supporting structure attached. All we need is the Mac's plastics.
Modding the Shell
Modding the shell is the most tedious of the work. Several parts need to be cut out of the back shell and front bezel in order for the tank to fit inside properly. This includes cutting a hole in the top of the Mac to allow access to the tank and grinding down parts of the plastic on the inside of the bezel.
At a minimum, the tools you'll need include:
- Drill
- Pencil and ruler
- Plain hacksaw blade
- Rasp and sandpaper
You're going to need something to do the large bits of cutting with. You can, conceivably, use the hacksaw blade to complete all of the cuts necessary, but that will take forever. Here, in order of preference, is the tool you'll want to use:
- Rotary tool (such as a Dremel)
- Small jigsaw
- Reciprocating saw
The rotary tool is by far the best tool to use for this, because with it you'll have the best control over the cuts. Some folks use cutoff wheels for the task; I've found spiral-cutting bits, such as those made by RotoZip, to work equally well. A cordless rotary tool will work, but you'll likely have to stop halfway through cutting to recharge the battery.
With the other tools, great care must be taken. No matter what tool you use, the hacksaw blade will be needed in order to finish and clean up your cuts. The drill will be useful for starting pilot holes, and the pencil and ruler will allow you to mark your cuts before you begin. When you're done cutting, little bits of plastic will likely remain along the cuts, so the rasp and sandpaper can be used to eliminate them.
First, a hole needs to be cut in the top of the rear casing to allow access to the tank (for feeding, adding water, etc.). Just how big you make it is up to you, but most choose to make the hole as wide as the inset handle and running from the front of the handle to the back of the machine. Below is a diagram of the typical cutout.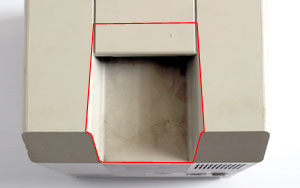
The recommended course of action is this: drill pilot holes where you want the corners of the cutout to be. The size of drill bit you use is going to vary with the dimensions of the blade you'll use to cut the hole with, naturally, but don't use a spade bit as the case plastic is too soft for it to work properly. If anything, drill a series of smaller pilot holes in the shape and size of the blade you'll be using. Worse comes to worst, just cut that crap out by any means necessary.
Take the cutting slow. The plastic is relatively soft, so you won't need excessive pressure in order to work your way through it. Mac 128k, 512k and kE, and Plus converters should note that because of the ventilation slots on the top of the computer, it's a wise idea to constrain your cutout to the width of the handle. If you stray too far outside, you may hit the vents and then the plastic louvers will break off. (And that'll look really crappy.)
So once the cutting is complete, clean up your cut with the hacksaw blade (if you strayed too far away from your guide lines) and then the file and sandpaper. Remember that you'll be sticking your hand in there, so get rid of any sharp burrs.
Now we can turn our attention to the front bezel. The four mounting tabs that the CRT was fastened to, in addition to other standoffs and raised parts, need to be cut down in order for the tank to sit flush with the inside of the monitor cutout.
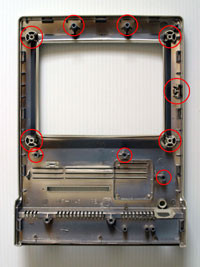 Here's what needs to get cut down in a Mac SE/30. Notice that not all supporting structures need to be eliminated; just the ones that jut out past the monitor cutout. Other model Macs may have structures in different places; use your best judgement in what needs to get cut down. In all compact Macs, at least the four CRT mounting tabs need to be ground down.
If you have a rotary tool with a cutoff wheel, you can use it to quickly and easily take care of the structures. If not, your best bet is to use the hacksaw blade, as a jigsaw will be too unwieldy to safely work with on the front bezel. Just use short, quick strokes to cut the standoffs about 1/2" shorter, like how you would slice a loaf of bread.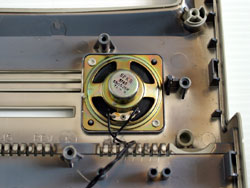
On some machines, like the Mac SE/30 shown here, there's a speaker attached to the front bezel. It's held in by nothing more than a couple plastic "welds." Just get a flat-blade screwdriver underneath the edge of each weld and pry it up. In short order the speaker will be free from the bezel.
Once the structures have been cut down, you don't have to worry too much about cleaning them up with the file and sandpaper; they won't be seen (except from the fish inside the tank maybe, but they don't care). Take to both halves of the casing with a sponge and some mild detergent to get rid of dust, dirt, and grime accumulated over the years. Some users have reported success in throwing the case in the dishwasher, but keep in mind that you cannot use a hot-water cycle or the plastics will distort.
Building the Tank
Where many MacQuarium builders turn back is at this point, where they have to build their own tank. In order for a MacQuarium to work properly, the tank must be custom-built; there are no "off-the-shelf" tanks that will work. Some people cheat by sticking an appropriately sized fishbowl in the shell, but those people are complete wimps. If you're gonna build a MacQuarium, you might as well do it right.
The tank holds a little over two gallons and, once complete, will nest inside the classic Mac shell perfectly. The tank works with all compact Macs (except the Color Classic, but if you're cutting up a Color Classic, then I need to have a word with you).
You'll want to make your tank out of glass. Plexiglass is a good idea on paper, but it's simply too flexible to work well for a tank. 1/8" (.125 inch) glass, commonly called "single-strength," is ideal for this purpose, and is cheap to have cut.
Most hardware stores can cut glass, but not many can grind down the edges for safety. You'll want to seek out a dedicated glasscutter for this project; they'll have the right type of glass on hand and be able to cut and grind it properly. Grinding down the edges keeps them from being sharp. You can cut yourself pretty badly even on cleanly cut glass; grinding the edges to a soft radius makes them safer not only for installation but for tank maintenance.
You'll need a total of five pieces of glass; a bottom, front, back, and sides. The table below lists the dimensions to which each piece should be cut. These dimensions take the thickness of the glass into account so all corners will fit squarely and evenly. If you were to use thicker glass, you would need to adjust these dimensions apprporiately.
Pane | Width | Height |
Front | 8 3/4" (8.75 in) | 9 7/8" (9.875 in) |
Back | 8 1/2" (8.5 in) | 9 3/4" (9.75 in) |
Bottom | 8 3/4" (8.75 in) | 8 3/4" (8.75 in) |
Sides | see diagram below | 9 3/4" (9.75 in) |
You'll notice there's no values for the width of the sides. That's because they're not square; the top is narrower than the bottom, and this is to accommodate the slope of the front of the Mac. The diagram below shows how to cut the two side panes from a single piece of rectangular glass.
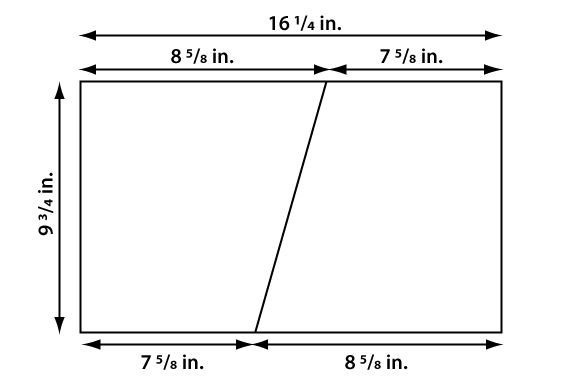
Likely you'll need to print these dimensions out so you can take them with you to the glasscutter. A PDF of these dimensions, including the above diagram, is available for download:
Download PDF (78KB)
Getting the glass cut should cost about $10 and take a couple days if the glasscutter can't do it on the spot for you. Once you get the glass back, measure each piece to ensure they've been cut to the precise dimensions above and then label them. You'll need them easily identifiable for when it comes time to assemble the tank.
In order to get the glass panes to stick together, form a watertight seal, etc., you'll need a special kind of adhesive. Those familiar with handiwork and such are probably thinking, "I'll just go grab the tube of silicone sealant from the garage..."
STOP.
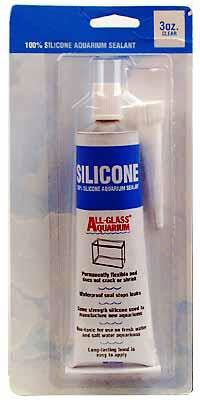
Ordinary silicone sealant is fatal to fish. It may work fine for your bathtub, but it is the wrong choice for building aquariums out of. A special sealant, designed specifically for use on aquariums, must be used. No exceptions.
This is the stuff you need to use. It's available at larger pet stores (PetsMart, Petco, etc.) in various sized tubes. You shouldn't need more than 3 ounces for your MacQuarium tank, but if you plan on horribly screwing up or building more than one tank you might as well get a larger tube. A 3 oz. tube should cost about $5.
Once you've got your sealant and glass ready, then roll up your sleeves and find an out-of-the-way, but well-ventilated, place to assemble the tank. After you've assembled the tank, you won't be able to move it until the adhesive has cured, which can take a day or more. The location also needs to be well-ventilated because the adhesive gives off strong fumes (acetic acid, to be precise). Doing this project in your bathroom is a bad idea. Doing it in your garage is a lot better idea.
Lay out your glass exploded-view style. Put the bottom pane in the middle, with the back, sides, and front around it. This will help you keep the panes straight (you did label them, right?). Open up your tube of adhesive and put the nozzle on it. These steps will guide you through getting the tank assembled. You can click each diagram to blow it up to full size.
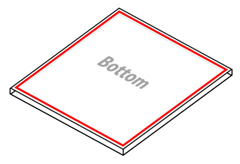
| Step 1. Run a bead of adhesive along the outside edge of the top of the bottom pane (got that?). All of the remaining panes of glass will rest upon the base. Pretend the red line shown here is the bead of adhesive. | |
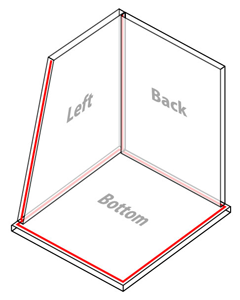
| Step 2. On the left side pane, run a bead of adhesive along the inside back edge, as well as along the very front edge of the glass. Then, press it into place on the bottom pane, keeping the back edge of the pane flush with the back edge of the bottom. There will be some space between the front edge of the side pane and the front edge of the bottom pane -- this is OK. Hold the side pane in place while following step 3 (it won't stay upright on its own). | |
| Step 3. Press the back pane into the adhesive on the bottom pane, then lean the side pane up against it as if you were building a house of cards. Try to keep the joints square and even. After holding the panes for a few seconds, they should be able to stand on their own. | |
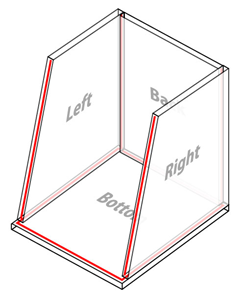
| Step 4. Apply adhesive to the right side pane in the same fashion as with the left (inside back edge, front edge) and set it into place. | |
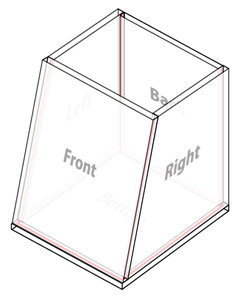
| Step 5. Press the front pane into the beads of adhesive awaiting it on the bottom and side panes. You're done! |
Once everything is set in place, just leave the tank alone for at least 24 hours. Don't touch it, move it, shake it, or even look at it for that time while the adhesive cures. Once your day of waiting is up, you can move the tank (carefully) to a more convenient location, but it won't be fully cured for another two days.
The Tank Base and Leak Testing
While you're waiting for the tank to cure, you can build the platform it'll sit upon. Grab some scrap wood (pine will do) and build a platform that's 7" by 8 1/2" by 1 5/8". If you don't have any scrap wood handy, you can either use old books wrapped in cellophane (to keep them from rotting) that are about the right size, or you can take the dimensions to a local home center, like Lowe's or The Home Depot, and get someone from the lumber department to help you.
All that's left is to water-test the tank. When it's fully cured, put it on some newspapers in the bathtub or shower stall and fill the tank up halfway. Check for leaks, and if there are none, fill the tank the rest of the way. Let it sit there for a good couple hours at least (with a day being preferable), and then check for leaks again. If the newspapers are dry and no water has escaped the tank, you're good to go. If you do have a leak somewhere, empty the tank and add some sealant to where you think the leak might be. Sometimes tank sealing can be a long, involved process, so the best advice to you is to put a good bead of adhesive on the glass when you're building the tank.
Provided the tank is watertight, you now have a basic MacQuarium. If you're familiar with fish, you likely can skip the next section. If you're not, head on over and read about setting up your MacQuarium for the first time.
Copyright 2009 Colin Wirth.

